Technology Tuesday–Have you checked your Picture CDs

March 1, 2016

2016-02-29_192726

The other day, my daughter asked me if I had any photos of a friend of hers (and mine). Sure, I said. But ….

The end of the story is, “yes, I did”. But ….

How many of us have Picture CD’s from the 1990’s? Have you tried to view those CD’s on your current computer ?

I had been using Seattle FilmWorks. Send them a roll of film and you got your pictures back on a CD. You may have gotten physical pictures and perhaps the negatives.

Here is a link to what Wikipedia has to say. Please take a look at that article if you used them. Oh, and pull a CD out of your archives and see if you can View the images.

What is a .SWF file ? It is NOT a JPG file or any other photo viewer that we might look at on our computer. Yes, there is a program on the CD, but have you tried to use is?

I am guessing, that like, me, we forgot to update our technology so that we can see those images now. But, that’s only 16 years ago, right?

Not done with the bad news yet. Seattle FilmWorks had a name change to PhotoWorks. They used the same SFW file format.

Try to find a Windows based program to move from SFW to JPG or something my computer can run. I found a Mac program and a Unix program, but not Windows. I did find a couple programs that did one image at a time, or ones that cost money. I figured there had to be some website with a downloadable program. I then remembered the name change. So, I searched for PhotoWorks.

I found PhotoWorks Version 2.41 at www.photoworks.com  downloaded it and spent some time learning how to use it.

The good news is, that not only have I been able to convert my SFW files to JPG, but there is an Album that can be opened with that program. The trick is learning where to find that file.

The biggest issue is to learn how the program works and where to put your SFW file and where do you want them to be stored.

The steps I am using:

  • Create an EXCEL file with Date and “Roll” number from label on the Disk
  • Create a Folder on my Hard Drive, Photo Folder in the Library
  • Folder Name format I used is YYYY-MM-DD-Roll Number
  • Copied from CD to PC
  • Converted SFW to JPG
  • Added a description of the content of that CD

2016-02-29_192833

As you can see, I have a lot of work to do, but I will have them converted and Inventoried. The picture at the top of this blog post is one of those images.

Lesson Learned: Keep up with the Technology


Technical Tuesday: Guest Speaker using Skype

June 26, 2012

These notes are more for myself, but thought I would share that I thought was important BEFORE the meeting.

I attend a monthly meeting of the Family History Interest Group, at the Bernards Township Library. Great group of folks, always have interesting speakers. Some of the speakers are local member, others from the area, and we have had some more widely known speakers.

This month, we are trying something new. We will have a very well known author and speaker, visiting us using Skype. My concern is that this type of presentation is New to this group, but we wanted the experience to be good for the group and the presenter.

These notes are more about the “technical” end of the presentation, but it is hoped that this preparation will help with our shared experience of having a Virtual Presentation. I am not new to “virtual presentations” with webinars, and presentations in Second Life, but to me this is different, at least for the audience.

Preparation, I thought, is key to our success. So, we set up a schedule with our Presenter, the Leader of our Group, and the I.T. (technical person) from the Library. What is involved and why this prep work:

  • Presenters Computer
  • Local Computer
  • Sound System
  • Skpye for communications
  • Projection System
  • Lighting

The presenter wanted to be able to see the audience, and of course the audience want’s to see the presentation. Skype, appeared to give us those capabilities.

The presenter has a Power Point Presentation for us to see.

The presenter has a YouTube Video to see.

So, what was done at the Local Computer, was to hook up a USB Camera, that can be moved as needed, but more importantly, pointing toward the audience, not toward whoever might have been at the local computer. So, the Presenter can see the group.

As happens a lot, we have Software Updates. Wouldn’t you know it, by SKYPE had a major (it appears) Update in the last day or two. While we able to establish the Skype Call, we had issues. Most of the “issues” were “Where did THEY move that command?”. After a little work, the 4 of us figured out what some of the standard settings had be moved to. For example, Share Screen. That would have really been a problem on the night of the event. So, the “dry run” / “technical rehearsal” was helpful right there.

Seeing the Presenter, the Presenter seeing the Audience, the Presenter changing over to Power Point was all good.

We tested the You Tube video. Since this was over Skype, we determined that the Local computer would go to YouTube direct, which would reduce a couple of internet connections.

The next issue was sound. We expect to have 100 +/- people in the room. Will PC speakers work? Oh, and what about Questions and Answers?

The good news, is that the library has a pretty nice sound system. The normal meetings are not that large, and the double room that will be used, is usually a single room, meaning not that large. The sound system isn’t usually needed.

The good news is that the Sound System can take a feed from the Computer. Good news, yes, and made a couple of volume adjustments from the PC output (sound system input) to make sure the whole room could hear the presenter through the Computer.

The sound system had a wired mike and a wireless mike. After the test, the wireless mike wasn’t going to work. Too much feedback through the Skype Connection.

Both rooms have separate sound systems, but the system has a way to combine them.

The Wired Mike and PC Sound were checked for both rooms, and the sound levels were adjusted.

The final piece was lighting. The Audience needs to be able to see the screen, the presenter would like to see the audience, so lighting might be an issue. In this room, the “normal” meeting with a presentation, the light are down, with some side lighting is on for safety and for folks to be able to take notes.

During the YouTube Video and the Presentation, the light will be down, and with the Q&A portion of the program begins, the lights will be turned up. Although the screen may have lights on it, the Presenter will be able to be seen, but the Presenter will be able to see the audience. With the moveable / flexible video camera associated with the PC, it can be pointed to the person asking the Question AT the Wired mike.

At the end of the Dry Run, we reviewed when the Call would be placed, the normal (or modified) meeting schedule, switching of screens between the two PC’s, were reviewed.

Lesson Learned: For the group hosting a virtual presentation, have a “technical run through” with the Presenter BEFORE the meeting to make sure the various pieces of hardware and software work together.


My recent experience: Camera People vs. Scanner People

June 1, 2012

Genea-Blogger, Marian Pierre-Louis of Roots and Rambles, posted this on her Blog:

Camera People vs. Scanner People

and it got me thinking. Which am I, a Scanner person or a Camera person.

I have now had two experiences, that related directly to this subject. The answer, for me, is “It Depends”.

My first experience was having a Camera and not help, and not the usual little ‘sand bags’ or weights to hold the paper down. The paper had been folded for years, and it was a letter written in 1916. The paper was folded, and I could not make out all of the text from the picture. I now have that resolved with a FlipPal.

This past week was a day at the National Archives and Records Administration, in Washington, D.C., Which do it take, Camera or FlipPal? Remembering my earlier experience, I took my camera anyway.

What I didn’t know was, what I was going to be looking at. A Pension file and some Land Grant Records. (first visit to NARA). I had no idea how many pages this would be. I expected a slim packet for my Civil War records, wrong, wasn’t sure about the Land Grant documents. I was not as concerned about these, it was that I wanted to see what was in them.

So, where do I stand. (and why).

I am a “both”, if you an be a “both”. I have both and will use both, and take both with me when I “might” find some family history information, even without a firm plan on seeing such information. I just through (gently place) my G-Bag in the back of the car, ‘just in case’. I normally have two cameras with me anyway, but  the FlipPal is in the Genealogy Bag.

For me, it’s a matter of “how much time to I have”. I would have not gotten though the Civil War file, if I had just tried the FlipPal. The pages were in all sizes, shapes, and forms, and I wanted both sides where applicable.

What I didn’t know, what in the Archives, they had a camera stand, WITH a pair of lights, just for this purpose. It was a matter of centering the page, making sure the page was within the screen, check for shadows, click, turn page over, repeat, next page.

Of course, my “wisdom” came from our tour guide, friend AND cousin Dear MYRTLE. She took two cameras. Since her “pull” of records came before mine, I helped her “turn the pages”. Here first batch, was done on the Camera Stand.

My second camera is a DSLR, and I didn’t want, nor see the need to take that with me. My small camera has done “good by me” in that past, so it was my choice.

Lesson Learned: Extra SD card, Extra Batteries. (I always have that, in the same camera bag) and used my “back Ups”.

My Land Records, were not done on the Camera Stand, but hand held at the workspace. Briefly looking at the pictures on the camera, both came out so that I can work with them.

I continue to be a Both person (camera or scanner), they both have a purpose for me, both are with me in the car.

But the FlipPal DOES have a feature that the camera doesn’t have. That is the ability to place the plexiglass sketch up over a photo and to be able to write on the plexiglass with names of the people in the photograph. This came in handy when visiting my Aunt with some old photographs, where I wanted her to identify the people in the photo.

Marian closed her Blog Post with this:

“Clearly I think the wand scanner has its time and place. What about you?  Which camp do you fall into and why?”

She mentioned a wand scanner, and with the work that she does, makes total sense. Change Wand Scanner with FlipPal, and I have the same comment. Each has its time and place.

Which camp do you fall into and why?

Both … and … it depends

Nice to have options.


Technology Tuesday–Photo Studio-In-A-Box

January 10, 2012

How to capture photographs of those family heirlooms that we collect over time?

About a year ago I was looking for a way to capture a good photograph of some jewelry that my daughter was taking pictures of. Along the way, I found a product, Photo Studio-In-A-Box. (link removed as it was broken)

IMG_5052

Easy to set up, easy to store, and provides for nice even lighting for small things. Before:

IMG_5032

After:

IMG_5036

The set up is simple:

IMG_5043


IMG_5044

And it folds up into this:

IMG_5051

So, how about those Heirlooms:

IMG_7308

Don’t forget the back:

IMG_7309

Josephine Strode – 2-24-1909

IMG_7313

IMG_7314

Josephine Strode – March 1909


IMG_7311IMG_7310

IMG_7315IMG_7318

Josephine Strode – 12/25/1898

IMG_7320

IMG_7321


Tech Tuesday – What Books do I own ?

December 13, 2011

It appears that Books are the topic of the week among Genea-Bloggers. Getting my genealogy books under control was on my To-Do List this past weekend.

Goal: be able to have a list of books that I own and where they are on my book shelves.

I thought I would share a tool that I found that has really helped me.

Collectorz.com Book Collector

Home Library / Book Database Software

Catalog your book collection in no time at all.
Just enter or scan ISBNs for automatic book data & cover art.

I thought that I would share how it works and how it allowed me to have a current, electronic version of my Genealogy Book Collection. How many duplicate books to you have? I have my share, but I didn’t have my inventory. I do now.

There are four pieces to this puzzle. You can do with two, but I am lazy, make my share of typing errors, but the majority of the job can be done with a Bar Code Scanner.

  • Collectorz Book (software)
  • Buddy for Barry
  • Collectorz Book for iPad
  • Buddy for Barry for iPad

The database is on my PC. You can manually enter ISBN or LOC codes into the database. But, I wanted to Scan Bar codes as much as possible. I can always go back and manually enter the ISBN and LOC codes if the Bar Code isn’t on the book.

How it works: Open up Collectorz Book program on the computer. (this is not an instruction manual, but a very high level view of how it works)

On the left is the Buddy for Barry Screen.  It’s job is to collect data from the iPad. When I open Collectorz Book and I am going to use the iPad scanner, I turn Buddy for Barry one. When the iPad is on, I then connect to it.

Buddy for Barry for the iPad is an AP for the iPad. Lots of Details HERE.

The larger part of the screen shows the Genre that I created. Basically I am going to put the books, on bookshelves by Genre. I have some basic Genealogy books, a lot of them, Cemetery collections, books for some states, some Family Histories. In the upper part of the screen is one of those Genre “(folders) open with the book title list.

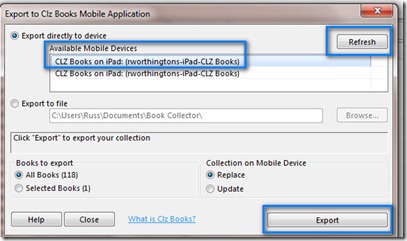
When I am ready to send the collection back to the iPad, the Blue square ICON is used to let Collectorz to send the collection to the iPad.

BookCollectorz-1

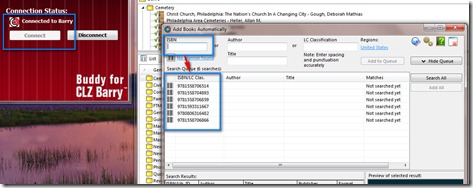
I then set up Collectorz Book to be ready to receive information from the iPad, using Add Books Automatically. You get there from the Edit Menu.

BookCollectorz-2

Over the the iPad, (screen captures are best seen on their website

Making sure that the Wi-Fi connection is active and activating Buddy for Barry, the Scan ICON on the iPad is selected and the camera of the iPad will now try to find a Bar Code.

Making sure that the Cursor on the PC is in the ISBN field, the ISBN number will automatically sent to the PC. You can also batch them between the two, but I found the Automatic feature works really well.

After you collect a number of numbers, then return to the PC to this screen.
BookCollectorz-3

Notice the top Blue square is the ISBN field that the cursor goes into. The 2nd blue square is the list of ISBN numbers sent from the iPad.

Now, Collectorz Book will then do a Search for those books and return the Title, Author, front and back covers, if available, as well as a lot of Publication information (Source Material)

BookCollectorz-4

You can see the ISBN number now are more information. Selecting one of the items, there is a place to Add the Checked Item. You can ADD ALL, but I had already inputted some data before I got Buddy for Barry. AND I didn’t want any duplication.

Clicking on the Add Checked will bring up a window where you can make changes, or in my case, selected one of my Genre’.

BookCollectorz-5

I checked Genealogy. You can create your own Genre just below that list of Genre.

You will see Duplications in at least two ways. You are given the choice to Add it anyway (if you have duplicate books, which I do). The first is a pop-up window, and below that is a warning below the book title.

BookCollectorz-6

BookCollectorz-7

If you don’t want to add the duplicate, you right click on the item and Remove Book.

BookCollectorz-8

Now for the output. Perhaps a screen capture will tell the story.

BookCollectorz-9

Lots of flexibility. In this case, the Genre is in the Left Column. That will tell me on what book shelf the book is. Book Shelves have labels. The sort then is by Author. I’ll use that order for the book shelf. At this point Author sort will work for me.

Screen capture of the “I” device that you are using.

BookCollectorz-10

Data on the PC, Report Printed, now to get the Data to the iPad, because that is what will be with me at a book store.

Activating the Collectorz Book on the iPad would be the next step. Here is a screen capture of that.

BookCollectorz-11

In the upper right corner of this screen is a Downward Pointing arrow, which will be clicked for the download, then going to the PC and clicking on the ICON in the first screen capture, this screen will be opened. It shows the iPad is there, if it isn’t, the Refresh button is there, and once the iPad is selected, the Export button is pushed.
BookCollectorz-12

Shortly after that, the complete collection of books are on the iPad.